Showing posts with label kids. Show all posts

Wednesday, February 27, 2013

Week 3 - Cartoon drawings (more fun with layers)

If you go to Palm Crest Elementary, or if you've taken my class in summer school, you have probably made a cartoon drawing of yourself using Photoshop Elements.  If you have, this will be good practice.  If not, I think you'll really enjoy this fun way to learn about layers.

  1. So let's start by opening a photo in Photoshop Elements.
  2. The next thing we do is make a NEW layer.  Name it OUTLINE and click ok
  3. Next, select the paint brush.
  4. Select color black, a hard edge brush style & a size (20 is good)
  5. Draw over image, outline everything in detail
  6. Add a new layer.  Name it COLORS and click ok
  7. Drag the COLORS layer and drop it below the OUTLINE layer
  8. Deselect (click) the eye on the Background layer to make the eye disappear
  9. While on the COLOR layer, use the paintbrush to paint your image.  Color the lightest parts of the image first.  
  10. Use the mouse wheel to change the size and color of the brush as needed.  Zoom in & out on your image to make sure you get the fine detail.
  11. Use the eraser button/icon or undo arrow if you go outside the lines.
  12. SAVE your work in your folder:  When you are done for the day, save your document with the extension .psd (this is the default).  When you are totally done making changes to your image save it as a .jpg (select from the dropdown menu) 


Many Thanks to Mrs. Bentz for writing up the steps.

Here is the start screen of Photoshop Elements 4.0.  This is what your toolbars and layers should look like when you first begin.


Wednesday, February 20, 2013

Week Two

Exploring Layers

This week we took a normal color photo and turned it into the type of photo you would see in a coloring book.

original photo thanks to funtimebirdy.wordpress.com


Here are the steps:

1) Duplicate the background layer (layer, duplicate layer) name your new layer: Parrot 1.  We now have two layers.  Click on the new layer to select it.

2) Next we need to take all of the color out of the photo.  This is referred to as "desaturating."

With the layer "Parrot 1" selected choose Filter > Adjustments > Gradient Map and choose the black and white option.  If your version of Photoshop Elements doesn't have this option, use Image > Adjustments > Desaturate

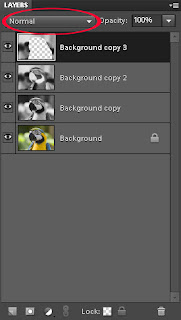
3) We need to duplicate the layer Parrot 1.  Right click on Parrot 1 in the Layers tray and choose duplicate layer.  When prompted, name your new layer: Parrot 2.  You should now have three layers.  Click on your new layer (Parrot 2).

4) With Parrot 2 selected go to Filter > Adjustments > Invert.  This will make your photo look like a negative.  Pretty cool!  But there's more work to be done.

5) In the Layers tray (on the right of your workspace) change the Layers blend mode for Parrot 2 from "Normal" to "Color Dodge."  This will make your photo almost completely white, but don't worry!

6) Still working on the layer Parrot 2 go to Filter > Blur > Gaussian Blur.  When the dialog box appears start moving the Radius Slider to a level where a sketch of your image begins to appear.  (On the left side there is no image, on the right is the entire image - you'll want something in between).

For my parrot sketch I worked in Photoshop Elements 9.0 and used a Radius setting of 11.5 pixels.

Sometimes our images don't work out the way we want them to work.  When that happens I play around with other settings.  With this project try the Motion Blur Filter as well as the Radial Blur Filter.  Exploring is one way we improve our knowledge.  And remember - SAVE YOUR WORK!

I want to thank Jennifer Apple for teaching me this technique.  I learned from this website.

Leave me a comment with questions or suggestions.  I'd love to see your creation - especially if you try something at home.